


NEPO Missions – What is it about?
Based on the ESA's ExoMars Mission 2022, the objective of the educational game NEPO Missions is to find signs of life on Mars. In order to bring the simulated Mars rover to its destination, players are introduced to the programming step by step. A Mars rover is available for this purpose. The ESA calls it Rosalind Franklin - in NEPO Missions it is called Rosa for short. This rover has various sensors at its disposal. The programming of the rover is done with the Roberta code editor.
NEPO Missions for Android NEPO Missions for IOS
NEPO Missions relies on the concept of visual programming, which has provided a playful introduction to children of reading age and up to programming in the Open Roberta Lab since 2014. Using »drag and drop«, the blocks of the graphical Fraunhofer programming language »NEPO« are plugged together and finally executed by real or simulated robots and microcontrollers.
Impressions of the Mars mission

., CC BY-SA 4.0, https://commons.wikimedia.org/w/index.php?curid=11065803")


Would you like to learn more about the planned mission and Rosa's namesake?
Then a visit to ESA Kids is worthwhile. There you will find exciting information and a video shows you how the first idea became a Mars-capable rover.
Solutions to the tasks
Tip: Click on the images to enlarge the sample solutions

- Use the arrow in the upper left corner to open the Roberta code editor.
- You can find the block »fold out solar panels« if you tap on the category »Action« on the left.
- Drag the block into the programming area with your finger. Try to slide it just below the start block to attach it to it.
-
If the block is transparent, it is not connected to the starting block. Try to slide it just under the start block to attach it to it.

- If you insert several blocks into your program, you can drag them one below the other and connect them in the same way as with the start block. To execute them, the top block must be connected to the red start block.
- You' ll find the block for taking the panoramic picture in the »Sensor« category.
- To see the assignment again, tap on the list icon below the question mark on the right. Therefore you have to close the help first.
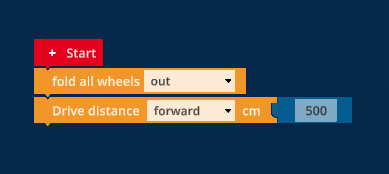
- To set how far Rosa should drive at the »Drive« block, you can either tap on the number in the blue »Numbers« block and change the number or connect another blue »Numbers« block.
- To see the assignment again, tap on the list icon below the question mark on the right. Therefore you have to close the help first.
- The »Rotate« block works with degrees (°). For example, 360° is a full rotation of the rover. 180° is a half turn. 90° is a turn to the side.
- Rosa slides a bit on the sandy ground and thus does not turn exactly.
- You can change the direction in which Rosa should turn by tapping on the »Right« area in the »Turn« block.
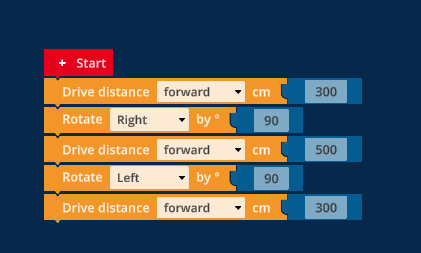
- To drive between the stones, you can first move forward 300 cm and then turn 90° to the right.
- Following the previous tip, you can drive 450 cm ahead and then turn 90° to the left. Afterwards, you only have to drive 300 cm forward.
- Blocks that are slightly transparent are not connected to your program. If you want them to belong to your program, you have to connect them properly first. If you forget, the error »Missing value« will appear.
- To set how far Rosa should go on the »Drive« block, you can either tap on the number in the blue »Number« block and change the number or connect another blue block to the »Drive« block, for example a calculation.
- In a calculation are two gaps. In these gaps you can insert other blue blocks like a »number« block or the »pi« block.
- A calculation usually adds two numbers on top of each other (plus calculation). But you can also tap on the »+« (plus) and select another calculation, such as »-« (minus) or »*« (times).
- Note that in the math block we only use dots and no commas.
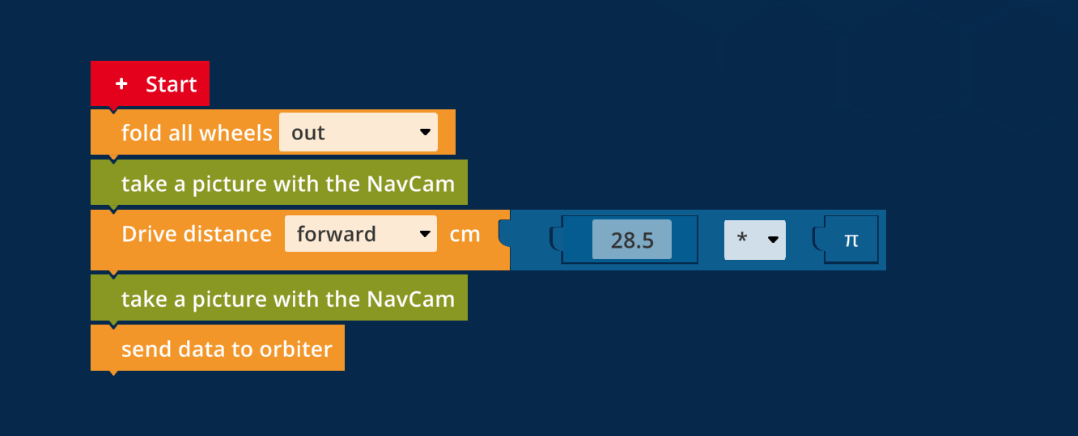
- Don't forget to unfold the wheels, take both pictures and send them to Orbiter at the end as well.

- Rosa moves forward exactly one turn if you let her move forward »3.14 * 28.5 cm«. You can program this with a »Calculation« block in the »Math« category.
- You can also nest the »Calculation« blocks. For this you can simply drag a calculation into one of the gaps of another calculation instead of a number. So you can take the calculation Pi * 28.5 directly times 5.
- If your program is so large that you can't see it completely, you can move the dark programming area with your finger and thus move your program. Make sure you find your program again, though!
- To see the assignment again, tap on the list icon below the question mark on the right. Therefore you have to close the help first.
- Rosa moves forward exactly one turn if you let her move forward »3.14 * 28.5 cm«. You can program this with a »Calculation« block in the »Math« category.
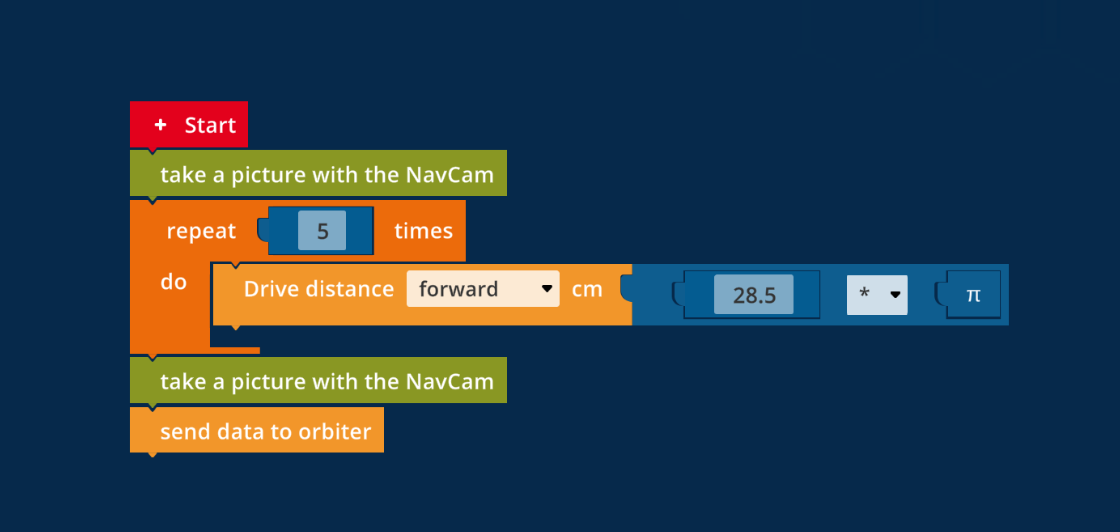
- You can find loops in the category »Control«. There is currently the »Repeat x times« loop.
- Loops are special blocks, because you can place other command blocks (e.g. actions) inside. To do this, drag any block to the connection point next to the »do« text. Only the blocks attached under this place will be repeated. When the repetitions are finished, it will continue below the loop.
- Don't forget to adjust the number of repetitions in the »Repeat x times« block by adjusting the blue number next to the »Repeat« text or by replacing the »Number« block.
- You can find loops in the »Control« category. There is currently the »Repeat x times« loop.
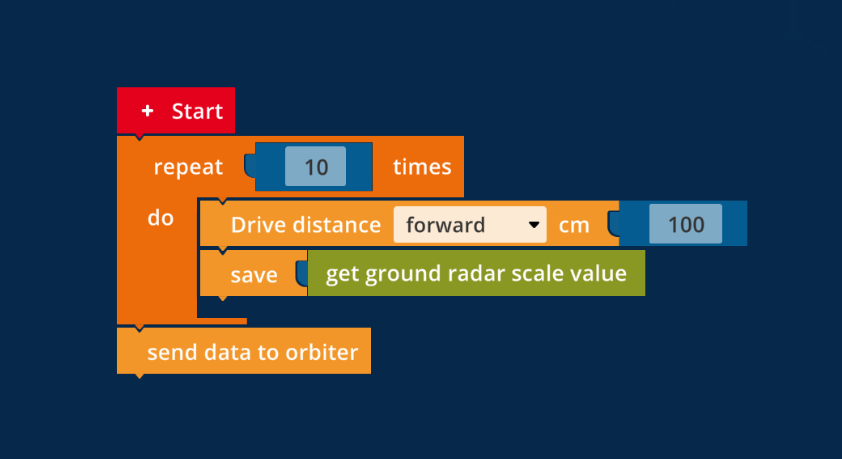
- Sensor measurements are not commands, but values. Therefore, you can't just attach them to your program, you have to connect them to a command. For example, the »Save« block is suitable for this.
- If you measure every 100 cm (1 meter) on a distance of 10 meters, you make 10 measurements. This is good for a »repeat x times« loop.
- Don't forget to send the data to the orbiter at the end as well.
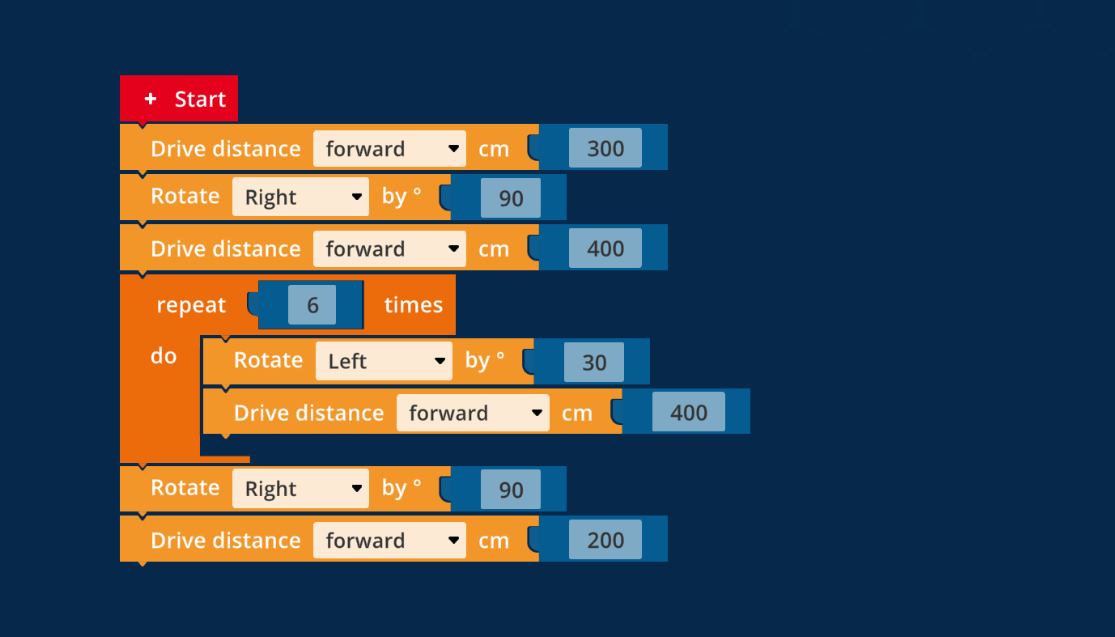
- To enter the first field, you should move forward 300 cm. Then turn Rosa 90 degrees to the right to align her with the second field. Then move forward 400 cm to land on the second field.
- You can reach the next 6 fields with a loop by first turning 30° to the left at each field and then driving 400 cm forward.
- After the loop, turn 90° to the right and then drive 200 cm forward. You are now in the finish area.

- A »Repeat Until« loop does not have a number to specify how many times it should repeat. Instead, you must associate a »Compare« block with it from the »Logic« category.
- A »comparison« block represents a comparison of two numbers that can be either true or false. »2 is greater than 4«, for example, is a comparison that is false. »3 is less than 5«, on the other hand, is a comparison that is true. The »Repeat until« loop is repeated until the comparison associated with it becomes true. For this purpose, it is checked again before each repetition.
- A »Compare« block has two gaps, into each of which a number or a sensor reading can be inserted. Between them is the so-called comparison operator. The following comparison operators exist: »=« (equal), »!=« (unequal), »>« (greater than), »>=« (greater or equal), »<« (less than) and »<=« (less or equal).
- The »repeat until« loop is useful to let Rosa move forward until the distance to the next obstacle is less than or equal to 20.
- In each repetition, Rosa should advance less than 20 cm so that she does not collide with the stone in any case. For example, 10 cm is a good step distance.
- To see the assignment again, tap on the list icon below the question mark on the right. Therefore you have to close the help first.
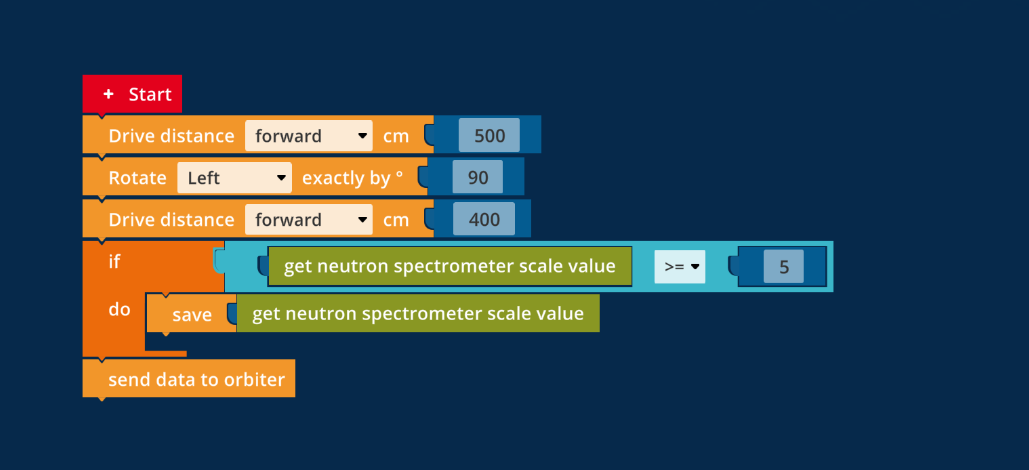
- Drive into the marked circle as usual. Use the neutron spectrometer there. The block »get neutron spectrometer scale value« returns a value between 0 and 10. You can compare this with a value from the known math block.
- After the drive and rotate blocks, the conditional statement, i.e. the »if-do« block should be used.
- The conditional statement could be as follows: If »get neutron spectrometer scale value >= 5«, then in the »do-part« of the condition the value of the neutron spectrometer should be stored.
- Don't forget to send the value to the orbiter.
- In this task, Rosa does not have to move.
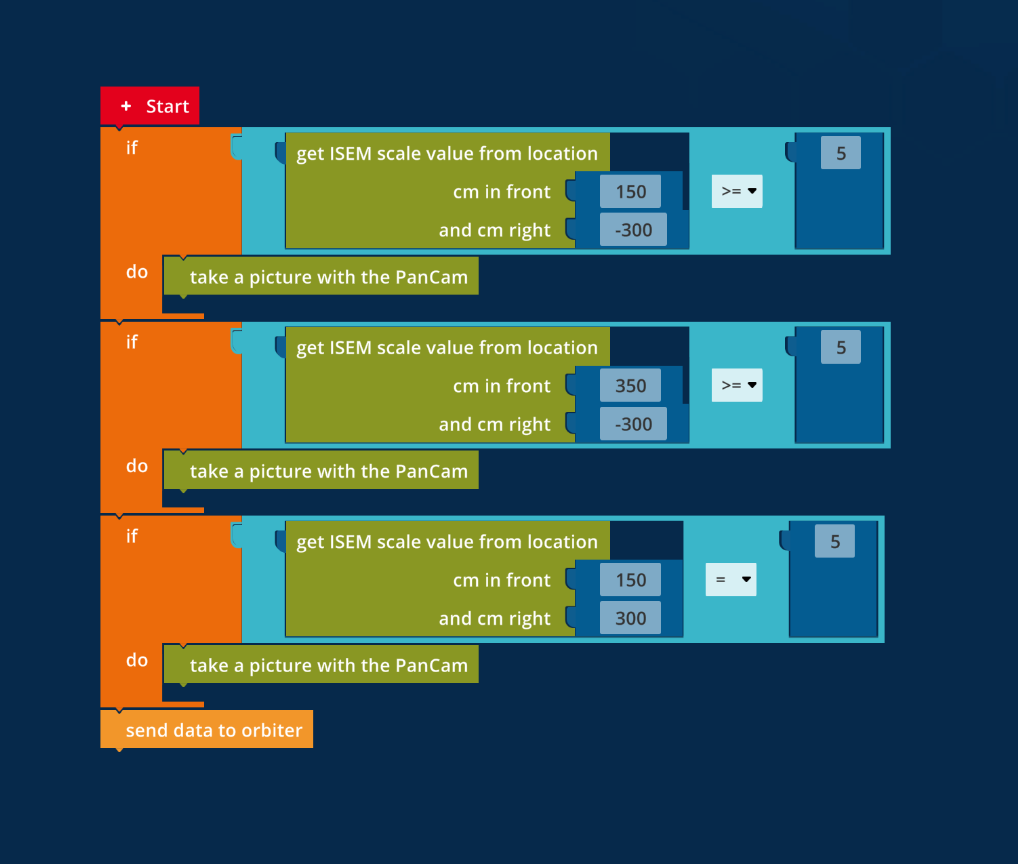
- With the block »get ISEM scale value from position« you can rotate the top of the pole and thus also the sensor to the desired position.
- For example, with -300 in the parameter field »and cm right« you can rotate the top of the pole 300 cm to the left. Use the »give ISEM scale value from location« block together with the logic block.
- In addition to the rotation, the distance from Rosa to the marker must also be specified. This can be entered in the »cm front« parameter field.
- Tip: The farthest marker is 350 cm away and the query in the logic block should include >=.
- Don’t forget to send the PanCam data to the orbiter after each measurement.
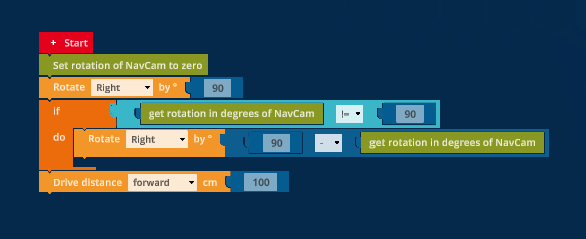
- Initialization means that the sensor is set to zero at the beginning of the program.
- To solve this task, you have to use the logic block together with the sensor block »get rotation in degrees of NavCam«.
- Rosa can rotate further, or to shorter than 90°. In both cases you can subtract the measured value of the NavCam from 90. Since a negative value, e.g. -2, i.e. if Rosa has turned too far, makes the rover turn to the left.
- Then you still have to drive forward.
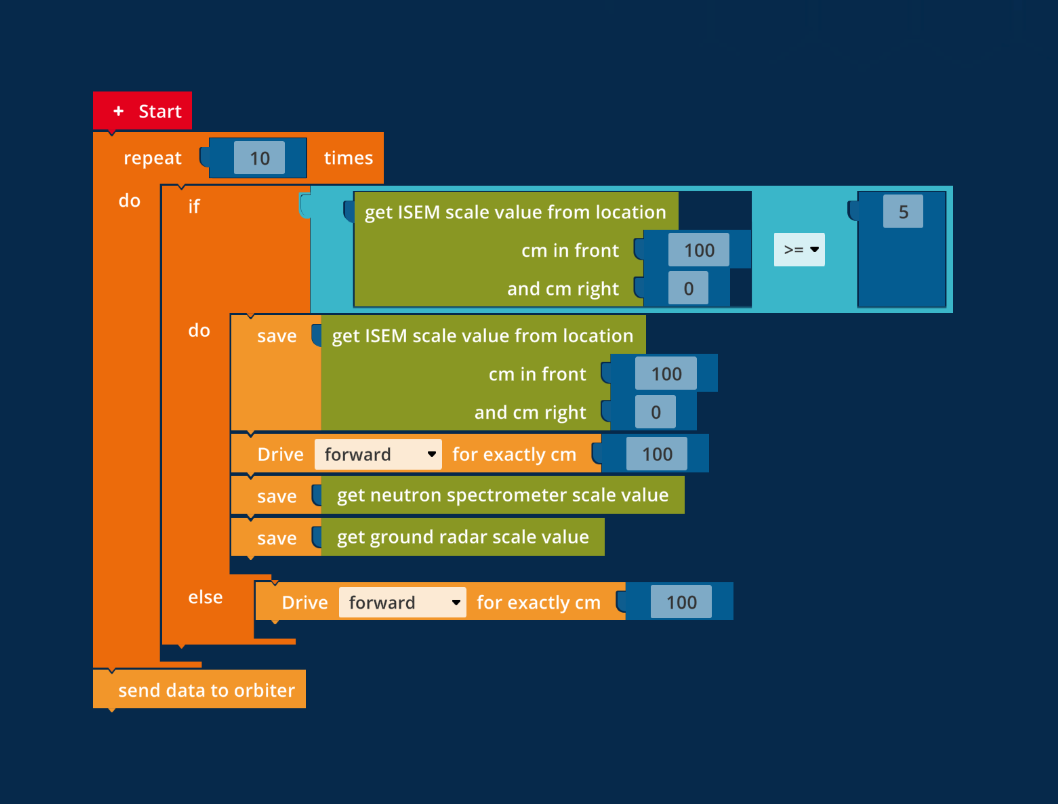
- To solve this somewhat more complex task, we first use the ISEM as part of the »If-do-else« block.
- If the ISEM measures a value greater than 5 (If >=5), we store it in the do part of the block.
- Then we move 100 cm forward and make the measurements with the neutron spectrometer and the ground radar and also save the values directly.
- Tip: Do not forget to save the values. If the ISEM measures a value < than 5, we simply move 100 cm further forward. We do this procedure 10 times in total (10*100 = 10 meters). Finally, don't forget to send the data to the orbiter.

- Use the program from the last task.
- This time, make sure that the values are saved only after the ISEM sensor has been queried, the other two sensors are also queried in the same way and measure a value >= 5.
- This can be done by using two interleaved if-do blocks (interleaved means that one if-do block is inside another if-do block). The second variant is to use one if-do block and use an AND block there to query twice whether the sensor values are >= 5 each.
- Example: If »get ground radar scale value« >= 5 AND »get neutron spectrometer scale value« >= 5.
- Make sure that you go back the 100 cm after saved values of the ground radar and the neutron spectrometer to save the value of the ISEM.

- Create three variables and name them so that you know directly what is hidden behind the names. For example, »radarValue«, »neutronValue«, »isemValue«. Variables do not start with a capital letter or a special character in the programming language NEPO.
- Now you can assign the created variables to a sensor value. For example, write isemValue »get ISEM scale value from location«.
- Then you can use the variable isemValue to query in the if-do statement whether the variable isemValue >= 5.
- You proceed in the same way with the other two sensors or variables.
- By using variables, you save going back and then forward again.
- Don't forget to save the variables and send them to the orbiter at the end of the program.

- Create three variables again, but this time not for the values of the respective sensors, but for the comparison of the current value with the maximum value.
- Store all three measured values in the variable e.g., »currentValue«. Afterwards a comparison takes place whether the variable »currentValue« is larger than the maximum value. If this is the case, the variable with the maximum value is overwritten with the value from the variable »currentValue«.
- Also note at which position you measured the maximum value. You can easily save this by saving the value of the NavCam.
- After you have measured all 15 values, go back to the point where you measured the maximum value. This can easily be done by the following calculation: 1600-saved position of the NavCam.
- Now you only have to set up the drill. After that you can give the command to drill and let the soil sample be examined. The result has to be sent to the orbiter afterwards.
Enabler
Publisher
Motivating, sustainable and practical: The Roberta initiative takes young people into the digital world. Since 2002, the educational program of Fraunhofer IAIS has been training teachers with the gender-appropriate Roberta course concept and has so far reached over 550,000 pupils in Germany. A Germany-wide network of partner institutions and the technological development »Open Roberta« make it a comprehensive program.
Funding
Google.org supports innovative nonprofits with funding, technology, and manpower to solve complex social challenges and provide access to the digital economy for all. We support this project through the Google.org Impact Challenge, which helps local nonprofit innovators and social enterprises make their community - and their neighborhood beyond - an even better place. Google.org is providing €250,000 in funding for this project.

Co-Operators
With around 15 years of experience and over 12 published games, Gentle Troll develops and designs serious games for mobile devices, web and PC and uses their potential to convey knowledge and information. With a lot of learning fun, but without wagging a monitory finger, games can convey complex relationships, invite experimentation and even allow failures.
Gentle Troll develops games with captivating gameplay and rousing stories that take you away from everyday life, show you new perspectives, and also make you think.